100 Strangers

100 STRANGERS TIPS PART 4: EXPRESSION

Part 4 of my series of 100 strangers tips is finally here! In Part 3 , I described 3 elements that make a good stranger portrait. However, I left out one crucial element as it deserved a post of its own. By far the most important factor in a street portrait (or in any portrait for that matter) is your subject’s expression.

Celebrity portrait photographer, Brian Smith’s advice for improving your portrait photography is to “go out and find 50 strangers, introduce yourself to them and shoot a portrait that says something about who they are, not just what they do”. This obviously resonates well with the 100 strangers project.

The key line in that sentence is “that says something about who they are.”  There are many times where your subject might give you the dreaded “Chandler Smile” (Friends fans will know what I mean, but for others it’s normally a stiff fake smile).  This is not ideal and so I thought I would share some tips on overcoming this and getting some more natural shots that conveys your subjects personality.

Note: Click on the pictures to read more about each encounter.

DON'T SMILE

The simplest way to avoid this “Chandler smile” is to simply ask your subject to look directly into the camera and not to smile. Interestingly enough, I haven’t employed this approach that often, but when I have, I was pleased with the results and Verena’s picture below was a great example. In reality she was a lot of fun and gave me some great light-hearted portraits. However, I chose this portrait where I had asked her not to smile as it felt more unguarded.

Stranger 43 - Veronica

Stranger 43 - Veronica


I don’t always insist on a non smiling portrait and if I see that they are a naturally smiley person then I go with it. Otherwise I usually see how they are in front of the camera first and take it from there.  I do, however, sometimes ask them tactically to not smile as a precursor to making them laugh, which brings me onto my next point.

MAKE THEM LAUGH

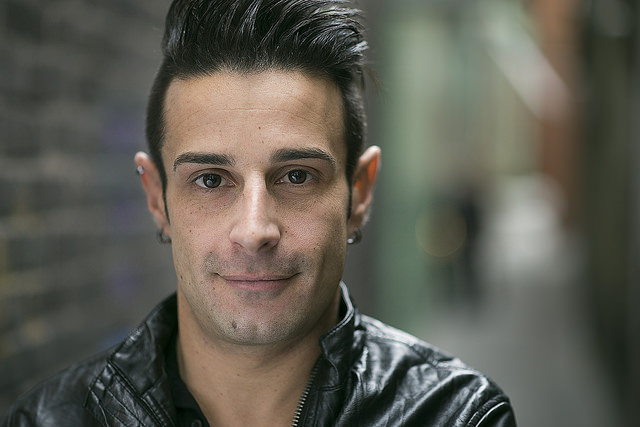
Rather than requesting a smile from a stranger and better tactic is to make them laugh. This way you elicit a reaction and therefore a more genuine expression.  One trick that I have found to work well is to ask them not to smile (as above) and then “tell them off” for looking miserable. No one wants to look miserable and there reaction is usually to laugh. I find this trick especially useful since you don’t always have much time to build rapport and this is a good way to get a quick win. This also gives you two different shots (the non-smiling one and the laughing one).  I can’t take credit for this as I learnt it from the Shebangmeister himself, Peter Hurley. The takeaway is to say something unexpected and fun which elicits a genuine emotion.

Stranger 83 - Elisa

Stranger 83 - Elisa

One thing to be careful when they are laughing is that you might miss focus at shallower depths of fields or at slower shutter speeds so be careful of that.

TAKE A CUE FROM WHAT THEY ARE DOING

When I take a strangers portrait, I usually position them where I want them in the frame but will then let them pose how they want to. I do this for 2 reasons: firstly, if they are directing themselves then the pose is likely to be more natural to them and they will be less stiff and secondly they might come up with something that I would never have thought of.

Sue Turner, who I met on the South Bank, is a perfect case in point. Had I posed her, there is every chance that I would have come up with a boring pose which would not have reflected her character. Instead, I got her to do her thing and as a result I got this shot. As Sue herself said it says “welcome to my world...you'll live to regret it.”

Stranger 29 - Sue Turner

Stranger 29 - Sue Turner

If your stranger is with friends you can use that to your advantage too, and not just by incorporating them as an assistant either. In this shot of Bianca. I had already taken a few shots of her and was happy with what I came back with. But when her friends arrived and said something about her mixed race face, I suddenly got the idea of doing a diptych showing both sides of her face separately to showcase how it looks a different ethnicity depending on the side. Once again I was able to come back with a portrait which is much more insightful than it otherwise would have been. 

Stranger 35 - Bianca

Stranger 35 - Bianca

SHOOT BETWEEN THE SHOTS

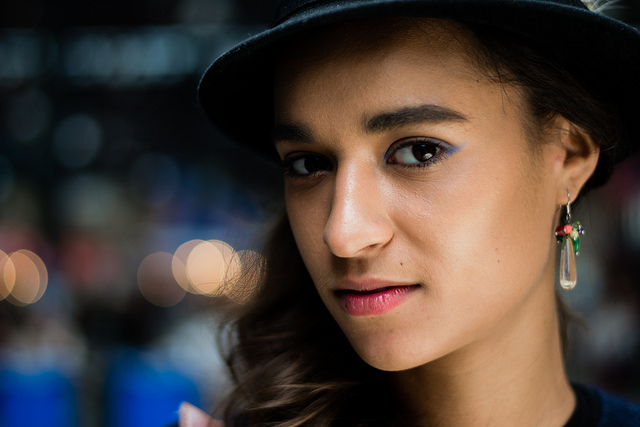
Sometimes the best shots are those that are between the posed shots. For a split moment they forget about the camera and a real moment surfaces.  The 100 stranger project can be great for this especially since by asking a stranger for a portrait you are already putting them on a high by the implicit flattery of your approach. This portrait of Stephanie is probably one of my favourites from my first round. I can’t remember in what context she was laughing but I do remember that it was between some pictures where she was more composed. The energy in this shot is infectious and was a no brainer for me when picking my final shot.

Stranger 33 - Stephanie

Stranger 33 - Stephanie

EDITING AND FEEDBACK

One of the rules of the 100 strangers’ project is that you may only submit one picture to the group. While I suspect this was partly to keep the group’s photo stream clean, it also forces you to edit your choice very carefully. By editing I don’t mean post processing but choosing which picture to submit.

I would recommend that you choose your photo based of expression first and foremost. Yes, the other shot might be sharper with better composition, but…… if the expression is not there then a viewer will not connect with the portrait no matter how technically perfect it is. In fact, in striving for that perfect shot, you might lose the soul of a photograph. In the image of Stephanie above you will probably have noticed that the image isn't sharp but as the great Henri Cartier Bresson once said: "sharpness is a bourgeois concept." 

You should also remember that there is one major difference between you and viewer, you were there and they weren't. This means that you see the picture very differently to them. When reviewing your pictures try to imagine how a viewer would see it and not how you see it. This is when it helps to get feedback from people whose opinion you trust.  I am lucky that I have a few fellow 100 stranger photographers (and friends) who I respect very much to get feedback from. They are always encouraging yet honest.

Stranger 118 - Andres (Contact Sheet)

Stranger 118 - Andres (Contact Sheet)

I shared the above three shots of Andres with them to get feedback as I wanted to see if they saw what I saw. The overall consensus was they preferred the expression in the left shot, but the composition in the others.  Now personally, I like the composition in the left too, but even if I didn’t, this was the only shot to go with.

So there you have it, a few short tips on getting better expressions in your street portraits. But before I go, I thought that I would share a link of an awesome headshot photographer, Dylan Patrick. When researching for this post I found his piece on investigating human expression to be by far the best article on expression on the web. In it he also shares a great tip on how to look for that expression as you are shooting. I really recommend that you check it out.

I hope you found some of these tips useful and would love you to share your tips to. 


1OO STRANGERS TIPS PART 3: WHAT I LOOK FOR IN A STRANGER PORTRAIT

In my last post I talked about approaching a stranger and in this post I share some of my thoughts on what makes a good street portrait. No matter what direction you want to take your project, I found that the key factors are the person, light and location.

IT’S ALL ABOUT THE PERSON

The question I get asked most by friends is how I choose my strangers. The answer is varied but usually there will be something about them or what they are doing that instantly draws me to them. When I dig deeper there have been so many reasons as to why I have chosen that person. Here are my main reasons

  • The stranger is full of character
  • He/she is stylish and fashionable
  • They look like they have a story to tell
  • They are gorgeous (yes Matt, I admit it) either in looks or personality
  • It’s the perfect person for the location
Stranger 81 - Yasmin (I think she ticked all the boxes mentioned above)

Stranger 81 - Yasmin (I think she ticked all the boxes mentioned above)

LET THERE BE LIGHT

Harry’s pal: “Don’t look at the light”

Harry: “I can’t help it! It’s so beautiful”
(A Bug’s Life)

After choosing the stranger I think this is the most critical factor in getting a strong picture. Light has a myriad of personalities that can influence the mood of a portrait. It is such a humungous topic that for this post I will just talk about avoiding crappy light (yes, that’s a technical term) and some ways to create flattering light.

Common lighting issues in street portraits

Eyes are the window to the soul and for that reason you want to avoid raccoon eyes. These are the shadows that are caused in the eyes especially when the sun is high during the middle of the day. If these shadows are really deep you may not even see the eyes.

In London, we have been known to occasionally see the odd clear blue sky and unrelenting sun. This almost always means a happier general public, train delays due to heat and red Brits due to sunburn. For us it can also mean squinting eyes which can just make your subject look uncomfortable.

Another classic problem can come from dappled light and typically occurs if you place your subject under a tree. This can cause uneven lighting on your strangers face and in most cases is unflattering.

The Golden Hour

The best light is during the golden hour which is either the hour after sunrise or the hour before sunset. This gives a beautiful soft golden light that is low enough to illuminate the face and especially the eyes.

Stranger 79/100 - Santi (taken around golden hour time)

Stranger 79/100 - Santi (taken around golden hour time)

But what about the rest of the time? There are 24 hours in the day and maybe you can’t go out during those golden hours. Never fear, there are plenty of ways to harness the light.

Open shade

Often the best option is just to seek the shade or more specifically open shade. Open shade is that sweet spot in the shade where your subject is still illuminated by the light but not so much as to cause the problem of racoon eyes and squinting as mentioned above.    

Overhangs from buildings can be a fantastic form of open shade since it channels the light and gives it a direction that you can play with. In this portrait of Ed I saw how the canopies from the shops were shaping the light onto his face.

Stranger 80 - Ed (using open shade)

Stranger 80 - Ed (using open shade)

Alleyways

Alleyways are fantastic for lighting street portraits as they create a direction and softness of light that can be hard to beat. They usually have the advantage of being in the shade as mentioned above and can sometimes also give you two light sources, one from the front and one from the back. This helps to take your portrait up a notch, and we all like that.

In Emile’s portrait, I was able to get both light on his face and a rim light around him since light was coming from both ends of the alleyway. The walls on either side also created shadows on either side adding depth and dimension to his face.


Stranger 93 - Emile (shot in an alleyway in Soho)

Stranger 93 - Emile (shot in an alleyway in Soho)

Use the environment to your advantage

If you shoot in the city, you can use walls to your advantage. Light coloured walls can become natural reflectors to bounce light back into a person’s eyes or you can use darker walls to create shadows for dimension and depth.  If you look around you there could be other things in your environment that you can use to modify and shape the light, for example, a white van could also be used as a makeshift reflector.

This portrait of Ricky in Soho was a classic example of using the various walls in this narrow alleyway to my advantage. The light coloured wall behind me reflected light onto his face while the dark walls on the side created the shadow to give his face shape and depth. The light coming from behind helped to add some light to his hair too. I also added a reflector to give his eyes some extra light and to make the image pop.

Stranger 99 - Ricky (using walls the shape the light)

Stranger 99 - Ricky (using walls the shape the light)

Enhance the light

As I mentioned in my post on getting started, I would highly recommend you invest in is a reflector. This has saved my you know what on so many occasions. Ricky’s portrait above show’s how, even with existing good light, you can enhance it and add some nice catchlights to the eyes.

Backlight

One fail safe option is to backlight the person, i.e have them facing away from the light. Not only do you get even light on the face but you can also make the hair pop from the light hitting it.  

Stranger 57 - Nicola (using Backlight)

Stranger 57 - Nicola (using Backlight)

LOCATION, LOCATION, LOCATION

I used to give more importance to location over lighting. Now, I would say light is more important, but location is close behind. The background must either add to the story or not be distracting. So what options do you have?

Bokeh the hell out of it: By blurring the background out, using a very shallow depth of field. Not only can you get rid of distractions, but it also gives a painterly depth to the image.
 

Stranger 90 - John

Stranger 90 - John

Clean backgrounds: Plain backgrounds are always a great option since there is almost always a plain wall which you can utilise to showcase your subject. You can then also use graphical design tools like complimentary colours to make your subject pop.

Stranger 69 - Jordon

Stranger 69 - Jordon

Cool Backgrounds: Sometimes the background is just cool. I had earmarked this spiral background for a long time but it took me a long time to find a stranger who would not be overpowered by it. When I saw Camilla I knew that the striking background would draw you to her

Stranger 78 - Camilla

Stranger 78 - Camilla

Seeing the Scene: One of the aspects of stranger portraits I would like to get better out in my second round is to include the environment more. This can give more visual interest to a portrait. In this portrait of David, I saw the strong graphical shapes being created by the stairs and gates as well as the symmetry of the bike.
 

Stranger 41 - David

Stranger 41 - David

So there you have it, a few pointers that help me get a good stranger portrait. I hope these are useful to you and please share any other factors which you think are important in making good stranger portraits 

100 STRANGER TIPS PART 2: FINDING AND APPROACHING STRANGERS

So you have made the decision to do the project, have your equipment and got out the front door. In Part one of this series we talked about getting started but where do you go and how do you approach strangers?  In this section I will go into more detail on finding and approaching strangers.

(Note: Click on the pictures to find out more about the stories behind the portraits)

FINDING STRANGERS

As you get more confident you will choose your locations differently but for now your goal is to just get used to asking strangers. I would therefore tend to try locations where your potential strangers will be relaxed, having fun and aren't in a rush. Here are a few places I have found to be great for finding strangers.

Events/Tourist locations

Anywhere there is an event of some kind or where many tourists go is usually a good place to start. You will find people are in a relaxed mood and also it will be easier to start a conversation. For example, a group of us went to the Tattoo convention in London to find strangers. We thought there would be a lot of cool characters who would love to have their tattoos showcased in a photograph. They would also be relaxed and were the types of personalities who would likely say yes to a portrait. In fact, I don’t think any of us had any rejections that day.

Stranger 39 - Eduard (shot near a tattoo convention)

Stranger 39 - Eduard (shot near a tattoo convention)

Markets

Market places are also great places for finding strangers. As well as asking the people hanging around the market, you could also ask stall holders and buy something in return. This helps to get over asking a person because you have in effect given something in return. However, unless this is the purpose of your project, I would only advocate doing this when you first start out to get your confidence up or if you come across a great character and/or a cool scene. In this portrait of Kat, I saw the headpieces being sold in Spitalfields market and wanted to get some out of focus headpiece in the foreground to lead you into the subject. 

Stranger 20: Kat (Spitalfields Market)

Stranger 20: Kat (Spitalfields Market)

Bohemian / Arty neighbourhoods

One other place you could go is anywhere that has a creative vibe or is bohemian in nature. Creative people are more open to having their picture taken as they appreciate the art. 2 of my favourite hunting grounds in London are Soho and Brick Lane. In both areas there is a creative crowd and also more recently a tourist hub too providing even more opportunity.

Stranger 14: Kade (Brick Lane)

Stranger 14: Kade (Brick Lane)

APPROACHING STRANGERS: OVERCOMING THE FEAR

Now that you have got to your location and found the perfect stranger all you need to do is approach them. What are you waiting for?

Well… some of you are going to find this easy and some will find it hard. I fall in the latter category and it took me 4 hours to approach my 1st stranger due to my fear of approaching someone. I was rocked with doubts about what that person would think of me and, if they said yes, whether I would be able to take a great picture. I was surprised that Simon agreed to a portrait at all given that I was shaking and fumbling my words. I was also surprised that I even managed to make my camera work but I must have done something right as I won a runner up prize for that portrait in a competition.

Anyway, enough about me! I could probably write a whole new post on overcoming the fear of approaching strangers but here are 3 things to help you on the way.

Remember you already have the “No”

You already have the “no” answer even before you approach a person. By approaching a person you are not going to end up with a worse outcome but have a high chance of getting a “yes.” The odds are therefore already stacked in your favour with no downside. It is like being given a free bet.

Embrace the fear

The fear will not go away. Approaching people will either be easy for you or difficult depending on your personality. I would love to say that it will get easier the more you do it and to some extent that’s true. However, there is a chance that it will never completely go away. I was able to accept that but knew it would not stop me from taking portraits. In a perverse way, that fear can be a good thing as it helps to keep your edge and means that you are still growing.

What does change though is your confidence in getting a good picture and this helps you to overcome it and go for it despite the fear. 

Stranger 15: Ivane

Stranger 15: Ivane

3 Second Rule

There is rule in dating community that says you have 3 seconds to approach a girl once you have made eye contact. I think there are 2 reasons behind this but for the purposes of street portraits the reason is simply that it stops you from over thinking it. You have seen your stranger just go up to him or her and ask. Worried about what to say? Read on….

WHAT DO I SAY?

It’s not what you say but how you say it

Have any of you seen the opening sequence to the Will Smith film, Hitch? The gist of it is that 90%  (60% body language, 30%  tone) of what you say is not coming out of your mouth!

There are many ways of approaching a stranger but what I have found to be more important is the energy that you bring to the approach. However, a strong, confident and authentic approach is the best way to achieve a successful outcome.  It almost doesn't matter what you say, it’s more about how you say it. I know if I bring an energetic and positive vibe then I am more likely to be successful. 

Flattery goes a long way

Flattery always goes a long away and people usually love to be noticed. If there is something about the person that you like, whether it’s their style, hair or something about else about them, letting them know helps to get things going on a positive note.

Stranger 81: Yasmin

Stranger 81: Yasmin

Keep it simple

My personal method is to keep it simple and direct. As an example I might say “Hi I am doing a photography project and love your style. Can I take your picture?” This a quick simple question which gives them the opportunity to give you an answer straight away and doesn't take too much of their time. They are then able to make a quick decision or ask more questions.

Have business cards or a phone to show your project so far

By far the most effective way for me to convince a sceptical person to allow me to make their portrait is by showing them examples of my work. I either have business cards or show them portraits on my smart phone. This achieves two things: Firstly it legitimises what you are doing and secondly it gives them confidence in you.  

I hope this helps you guys to get you on your way. What are your tips for finding and overcoming the fear approaching of Strangers? 


GETTING STARTED ON YOUR OWN 100 STRANGERS PROJECT

I started my 100 strangers project as a means to improve my portrait photography and, more importantly, because I thought it was cool. Inspired by award winning photographers like Steve McCurry and newer photographers such as Danny Santos who did his own stranger project, I decided to have a go myself. I mean how difficult could it be to ask a random person for their photograph. It should be easy right?

Well, not for me. I didn’t want to take just average snapshots but to make portraits of people that revealed something about that person. And it took time for me complete the project, over 2 years in fact. This was partly due to having the free time but also because I was patient and wanted to learn.

Stranger 1 - Simon

Stranger 1 - Simon

I found and joined the best group on flickr, 100 Strangers, and got out there and started to make street portraits. Having completed the project, I wanted to share some tips and thoughts on it. I originally envisaged one post of tips, but when I started putting the metaphorical pen to paper, I realised that there many considerations which go into making a portrait.  I have therefore opted to split this up into a number of posts so that I can give each section the attention it deserves. For this post I will concentrate on getting started and some tips on gear. 

GETTING STARTED

Like Nike says, Just do it.

For some people asking a random person for a picture is easy and for some it’s difficult.  Either way you will find out quickly that it’s exciting, exhilarating and gets the heart pumping.  As soon as I had had my first successful stranger interaction, I knew that it would be addictive and I would be completing the project come what may.

I will go into more detail about approaching strangers in the next post but for now all I will say is “What are you waiting for? Get out there and start shooting!” When you first start there is a danger that you might overthink it.  It’s probably best to just concentrate on getting used to asking strangers to begin with. There are so many elements to taking a photo and if you concern yourself too much about this you may never get started. Better to just bite the bullet and get going, you can then concentrate on improving one thing at a time.

GEAR

What do you need to make stranger portraits? When it comes to camera equipment and gear I will focus on just the essentials in this post. You can have as much or as little as you want, but when getting started, I believe that you don’t want to worry too much all the different gear as this could bog you down. The key for me when it comes to gear and street portraits is portability.

All you really need is a camera

With that in mind all you really need is a camera. “Is that it?” I hear you ask. Well almost. Whilst any camera will do to make portraits, investing in a good camera (like a DSLR or mirrorless camera) and a portrait lens with a wide aperture will really take your portraits to the next level. This will ensure that you can create a shallow depth of field that will make your subject pop. I personally started with the entry level Nikon D3100 and a borrowed 35mm 1.8 lens before buying a cheap 50mm 1.8 lens.  The combined cost of this was less than £500 when I bought it and you could get something equivalent for even less now.

Stranger 23 - Frida (shot with Nikon D3100 and 50mm 1.8 shot at 1.8 to create the blurred background)

Stranger 23 - Frida (shot with Nikon D3100 and 50mm 1.8 shot at 1.8 to create the blurred background)

But a reflector helps too

Having said that, one other piece of equipment that really helps is a reflector. You can use a reflector to shape and direct the light falling on your subjects, make your subject pop from the background, and make the eyes sparkle by adding some pleasing catchlights to them.

 As you are most likely to be doing headshots they do not need to be big. A quick search in Amazon will give a variety of options. Lastolite do some great reflectors of all sizes but you can also get much cheaper and equally good ones from other suppliers.

I didn’t start with a reflector straight away but as soon as I did, there was a big jump up in the quality of my portrait photography.

Stranger 16 - Julie (shot with a reflector)

Stranger 16 - Julie (shot with a reflector)

Gotta bag it up

The final thing you need is a bag to carry it all in. As you can see the get up is very light and therefore the bag doesn’t need to be big. That way if you want you can always have it on you and if you find that perfect stranger you will be ready.

GO OUT AND HAVE FUN

So there you have it, a quick piece on starting out and the equipment you need to get going. In the next piece I will go into further detail on finding and approaching your stranger. In the meantime, if you have any questions please feel free to ask me any questions on in the comments below. Please share your own stories and tips on getting started and let us know what you think is the essential gear for street portraits...